

Hoymiles Knowledge Base: Your Microinverter Questions Answered
Get answers to your microinverter questions! Explore installation tips, troubleshooting, compatibility guides, and solar optimization strategies for Hoymiles systems.


Hoymiles microinverters provide homeowners and business owners with solar solutions that are not only high performing but also flexible and cost effective.
To help you gain a better understanding of our microinverters, and learn helpful tips for your solar system, we’ve addressed some frequently asked questions based on customer feedback.
Table of Contents
Q1: How do I connect microinverters in a series?
Q2: Is there a sequence I should follow when connecting four PV modules to Hoymiles 4-in-1 microinverters? Can I use all the four input channels, even if I only have three PV modules?
Q3: What is Sub-1G wireless communication? And why is it more suitable for commercial and industrial installations?
Q4: What is the heat dissipation mechanism of Hoymiles microinverters, and is it normal for microinverters to have high temperatures?
Q5: Why do some Hoymiles microinverters have four input channels, but with only two MPPTs?
Q6: How can I achieve zero export to the grid using Hoymiles products?
Q7: Can I use single-phase microinverters in a three-phase grid system?
Q8: What should I check if the power of my microinverter suddenly drops
Q1: How do I connect microinverters in a series?
Hoymiles microinverters offer two types of wiring:
- Daisy-chain connection – microinverters connected end to end
- Trunk connection –microinverters are connected to a trunk cable which is wired to the distribution box
Daisy-chain connection
In this connection, you form a single loop by simply plugging the AC connectors of the microinverters together end to end. Then, you connect the last microinverter to the AC end cable.

You can also use extension cables if two microinverters are far apart.
However, it’s important to note that you can’t loop in as many microinverters as you want in a single circuit branch. This is because the current of each microinverter will accumulate, and you should make sure the total current doesn’t go beyond what your system can handle.
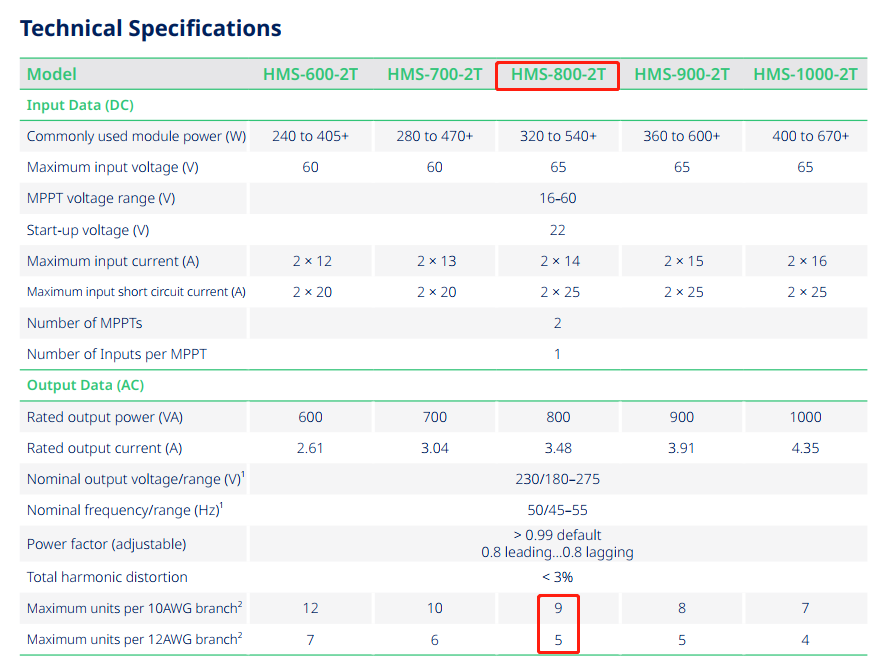
You can find out how many microinverters can be placed in a branch by referring to the Maximum units per branch section of the microinverter datasheet.
You can also easily calculate the upper limit of your system.
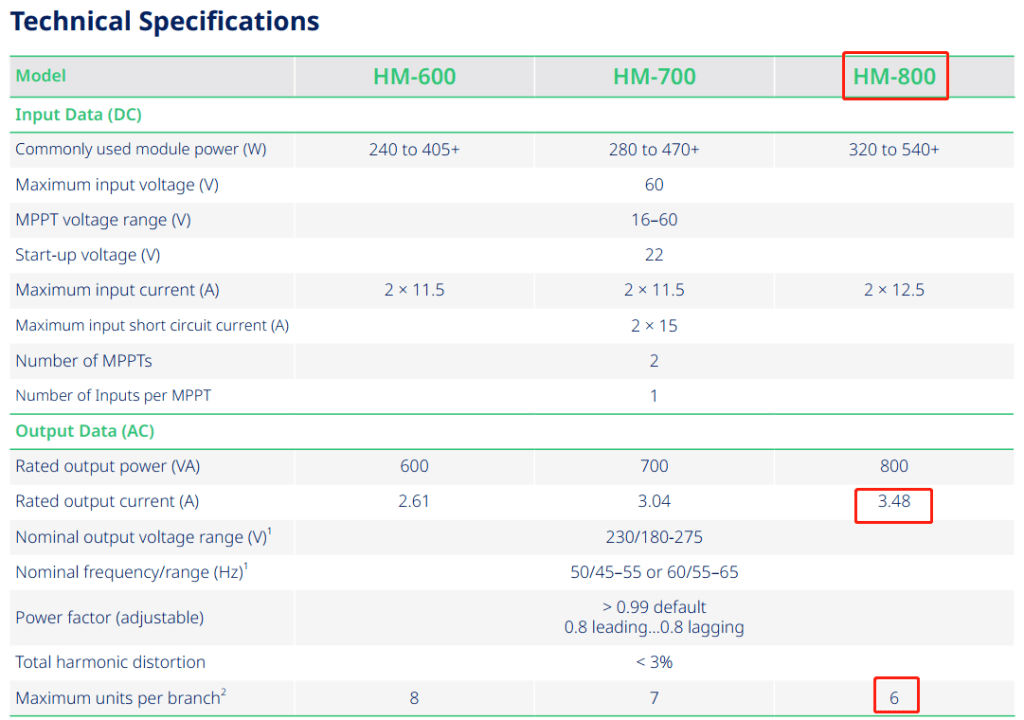
Take HM-800, for example. We’ve highlighted it in red for you in the table below.
You just need to refer to two specifications: the rated output current from the microinverter datasheet, and the rated current of the AC cable. These specifications may vary depending on local standards.
The output current of HM-800 is 3.48 A, and the current of the AC cable is 24 A, based on the European standard. So, by dividing 24 A by 3.48 A, you’ll get 6.89 – meaning that you can have at most six microinverters in a branch.
If you install seven microinverters, the combined current will be 24.36 A, which is larger than 24 A, and would be above the system’s capacity. That’s why you should always round down, and why we only specify six microinverters in the datasheet.
In this case, if you have more than six microinverters, you will need to set up multiple circuits for your system to work safely.
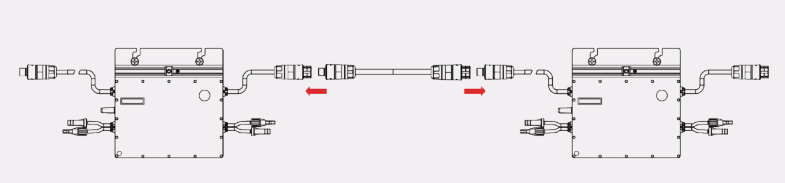
Trunk connection
In the trunk connection, each microinverter is independently connected to an AC trunk cable, which is then wired into your distribution box.
Instead of having all the current pass through each microinverter in a series connection, the parallel-connected microinverter setup means multiple devices are connected in a point-to-point system.
As a result, it’s less likely to create electromagnetic interference in the microinverter, and is much better for heat dissipation.
This is why we recommend using a trunk connection for high-power microinverters for better safety and performance.

However, there’s also an upper limit as to how many microinverters can be connected to a trunk cable. Just like with daisy-chain connections, make sure you refer to the datasheet before planning the system layout.
 For more information, check out our practical guide for avoiding overcurrent issues during microinverter installation.
Q2: Is there a sequence I should follow when connecting four PV modules to Hoymiles 4-in-1 microinverters? Can I use all the four input channels, even if I only have three PV modules?
No, there is no fixed sequence to follow. You can connect any DC inputs as you wish. But make sure not to power up the system before you finish the wiring!
Hoymiles 4-in-1 microinverters offer four input channels, but you don’t necessarily need to use all the inputs if you only have three PV modules. Leaving one input open won’t lead to any faults or abnormal operations.
If your energy demand grows in the future, you can simply buy another PV module and plug it into the vacant input.
Q3: What is Sub-1G wireless communication? And why is it more suitable for commercial and industrial installations?
What is Sub-1G wireless communication?
Sub-1GHz communication technology refers to radio frequency signals operating at frequencies below 1 gigahertz (GHz).
Unlike the common Bluetooth, ZigBee, and Wi-Fi technologies – which operate in the crowded 2.4GHz range – Sub-1GHz offers a unique advantage: uninterrupted, stable communication.
It’s one of Hoymiles’ pivotal innovations that make going solar easier and smarter.
What makes it ideal for commercial and industrial PV projects?
Operating commercial and industrial (C&I) solar systems presents more unique challenges than home installations, requiring more robust data transmission for optimal economic performance.
Here’s how our Sub-1GHz microinverters overcome these challenges:
- Unbeatable stability:C&I infrastructure like factories, clinics, and office buildings, have huge energy demands. To promptly address potential issues, there is a need for instant and stable data transmission. Sub-1GHz communication operates in a less congested frequency range, enhancing reliability and resistance to interference. This results in fewer retransmissions, so you can consistently monitor your solar performance without unexpected interruptions.
- Extended range: Sub-1Ghz wireless transmission covers 1.5 to 2 times more distance than the 2.4Ghz spectrum – covering up to 400 meters in open space. It’s also strong enough to bypass obstacles. This means that your operational data can be collected and sent to the cloud, even if your gateway data transfer unit (DTU) is positioned far away from your microinverters or behind obstructions.
- Energy efficiency:Sub-1GHz microinverters are not only communication powerhouses – they’re also energy efficient. They consume less power during data transmission, contributing to overall energy savings in your solar system.
Q4: What is the heat dissipation mechanism of Hoymiles microinverters, and is it normal for microinverters to have high temperatures?
As the powerhouse of the solar system, microinverters can experience heat buildup, especially in high summer temperatures.
But you don’t need to worry about that. Because we have designed our microinverters to withstand such conditions.
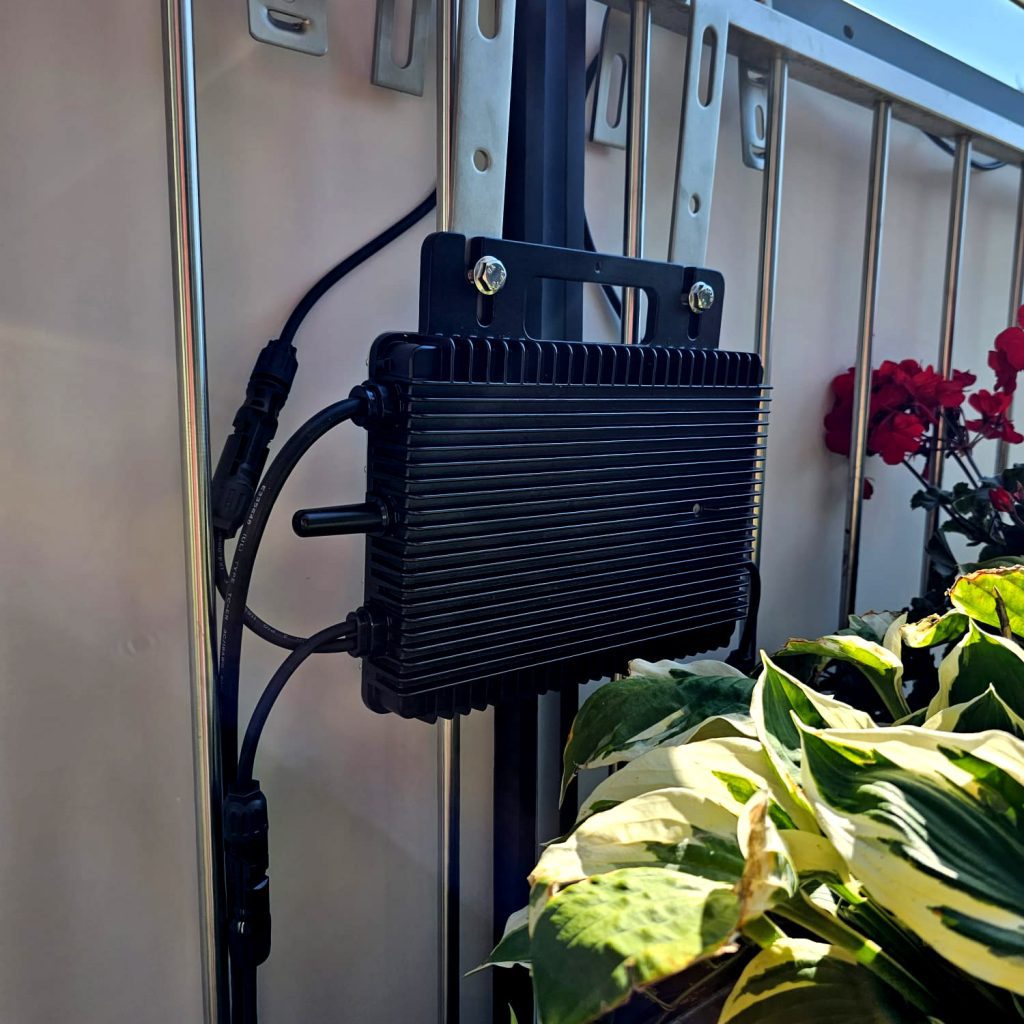
Firstly, we adopt natural convection in our microinverters, eliminating the need for fans. This is achieved through fins on the back cover of the microinverter, which not only increase the surface area for better heat dissipation but also create space between the fins for air to flow and carry away heat – a process known as convection.
 Secondly, one of the most temperature-sensitive components, the electrolytic capacitor, is strategically placed in the coolest and most well-ventilated area of our microinverters. This helps dispel heat effectively, contributing to the stable operation of the microinverter.
Thirdly, Hoymiles microinverters boast a wide ambient operating temperature range of -40° to +65℃, making them resilient in extreme conditions.
Given that all electrical equipment heats up during operation, it’s normal for microinverters to experience high temperatures, especially on hot summer days. The temperature is influenced by factors like output power, humidity, and ventilation.
However, you can have peace of mind knowing that Hoymiles microinverters are rigorously tested and incorporate a self-protection mechanism called “de-rating.”
Learn more about microinverter heat dissipation in our previous article.
Secondly, one of the most temperature-sensitive components, the electrolytic capacitor, is strategically placed in the coolest and most well-ventilated area of our microinverters. This helps dispel heat effectively, contributing to the stable operation of the microinverter.
Thirdly, Hoymiles microinverters boast a wide ambient operating temperature range of -40° to +65℃, making them resilient in extreme conditions.
Given that all electrical equipment heats up during operation, it’s normal for microinverters to experience high temperatures, especially on hot summer days. The temperature is influenced by factors like output power, humidity, and ventilation.
However, you can have peace of mind knowing that Hoymiles microinverters are rigorously tested and incorporate a self-protection mechanism called “de-rating.”
Learn more about microinverter heat dissipation in our previous article.
Q5: Why do some Hoymiles microinverters have four input channels, but with only two MPPTs?
You might have noticed that the number of inputs and the number of MPPTs are not necessarily the same for certain Hoymiles microinverter models.
Before we delve into the question, let’s clarify the difference between input channels and MPPT.
Input channels determine how many solar modules can connect to a single microinverter. MPPT, short for maximum power point tracking, ensures that the microinverter consistently tracks the voltage and current of each module, optimizing its output power.
Now, back to the question.
In short, the overall performance of both design types is quite similar, but with some minor differences:
- For microinverters with independent MPPTs, each module is independently calculated and tracked. This means that PV modules can be positioned with different orientations without affecting each other.
- For microinverters with four input channels but only two MPPTs, two PV modules on the same side are connected in parallel inside the microinverter and share one MPPT.
So, if one module experiences underperformance, for example, due to heavy shading or differing orientations, the output power of the higher-performing module will drop slightly.
That’s why we recommend placing PV modules under the same MPPT in the same direction for maximum yield. This type of design is also more budget friendly, making it a good option for lower-funded projects.
Which design should you choose? It depends entirely on your solar needs and the conditions we’ve mentioned above – but make sure you opt for the one that will maximize the power output.
Q6: How can I achieve zero export to the grid using Hoymiles products?
Hoymiles offers a Smart Power Export Management solution to control the amount of power sent to the grid. This system is composed of a Hoymiles microinverter, a smart meter (customized for Hoymiles), and a gateway DTU-Pro (or DTU-Pro-S).
The meter can be installed either on the load side or the grid side, but for accurate power measurement and achieving zero export, we recommend installing it on the grid side.
To achieve zero export, you can simply set the power export limit value to 0 on the S-Miles Cloud platform. The smart meter will then measure the current power production and send the information to the gateway DTU.
The DTU will dynamically adjust PV power production based on meter measurements to ensure that no power will be fed to the grid.
Alternatively, you can also set how much power you wish to sell to the grid.
This solution guarantees compliance with grid export regulations, allowing you to run your solar initiative profitably without any violations.
Q7: Can I use single-phase microinverters in a three-phase grid system?
Yes, you can use single-phase microinverters in a three-phase grid system. As you’ll see in the diagram below, you can connect three microinverter branches to the three-phase grid system.
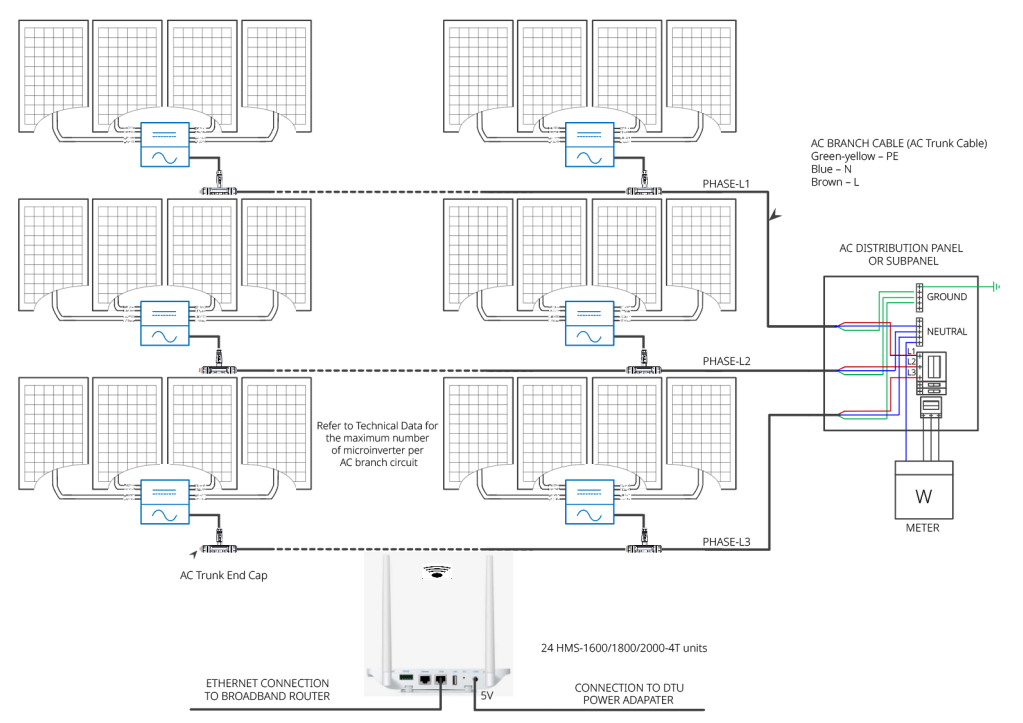 Activate the power balancing solution through the S-Miles Cloud monitoring platform to configure your microinverters for each phase and control the power difference.
It’s essential to adhere to local regulations when it comes to power differences. According to EN50549-1:2019, for example, the power difference between phases must not exceed 3.68 kW.
Find out more about the three-phase power balancing function here.
Activate the power balancing solution through the S-Miles Cloud monitoring platform to configure your microinverters for each phase and control the power difference.
It’s essential to adhere to local regulations when it comes to power differences. According to EN50549-1:2019, for example, the power difference between phases must not exceed 3.68 kW.
Find out more about the three-phase power balancing function here.
Q8: What should I check if the power of my microinverter suddenly drops?
Refer to the alarm information displayed on the S-Miles Cloud platform, and carry out troubleshooting as shown in the user manual.


Subscribe to our newsletter and get the latest news!